Showing posts with label felling trees. Show all posts

Thursday, October 23, 2014

Forest Products: Hard Maple Flooring

American hophornbeam for fencing
I have posted on more than one occasion, regarding the felling of trees, bucking and splitting to produce wood fuel, and chipping to produce mulch.  There is also American hophornbeam (aka ironwood, see under "Trees" on the Plants & Animals page) growing on the homestead, which makes great fence posts; I have perhaps 15 to 20 such posts air drying now.  Hophornbeam can also be used to make long bows and re-curve bows, which I intend to attempt in the future.  Of course maple syrup is another  forest product, and one we intend to expand our production of in the spring of 2015.  And the list goes on.

The first Sugar Maple felled with its intended
use as flooring.
The most ambitious forest products project yet started however, is to harvest sufficient Sugar Maple for the production of hardwood flooring for the house.  Geri and I looked at what I refer to as "manufactured hardwood flooring," because it consists basically of a thin hardwood veneer, which would allow the floor to be refinished once or twice, on an engineered wood substrate; these products ran from $5-$7 per square foot, plus installation.  We also looked at re-purposed barn wood, and again we found ourselves looking at $5-$7 per square foot before installation.
The home requires roughly 2,000 square feet of flooring, so before laying the product on the sub-floor we would be into the project for $10,000 to $14,000.  Beyond the numbers though, which I will admit resulted in sticker shock, it was simply the principle of the thing; buying wood flooring when I am living in 50 acres of old growth forest seemed to me to be inconsistent with the whole notion of homesteading.  Geri and I had a few conversations regarding the longer lead-time involved in doing it ourselves, though ultimately, the anticipated satisfaction of having done it ourselves, that pride of ownership, nay, the pride of actually crafted the flooring ourselves, won out.  And so, on 18 August, 2014, I felled the first Sugar Maple with the intention of using it for wood flooring.

As early as 25 June I was in conversation with a local sawmill, desiring to both understand the process and the cost of manufacturing our hardwood flooring, as fodder for our decision-making.  My notes from 30 June:

"Hi Chris,

details from our earlier phone conversations are below.  Please let me know if you agree.

$1,512.50 --  Mill 2,750 board feet of sugar maple @ $0.55/board ft (1 inch thick, 3-7 inches random widths)
   $151.25 -- 10% waste factor (Do I need this factor? I'm paying for the waste by paying to mill and dry 2,750 board feet and leaving with 2,475 board feet, it seems to me.  Help me understand.)
   $687.50 -- Kiln drying @ 0.25/board ft
$1,500.00 -- Planing (to 3/4 in thick, tongue & groove, no micro-chamfer, @ $50/hr, 30 hrs)
-----------
$3,851.25

Notes:
-- Calculate 20% loss from the log to floor (I should have about 200 sq ft left over)
-- Cut 16-26 inches diameter logs to between 4 ft and 8 ft 6 in long
-- Air dry, 3-5 wks (weather dependent)
-- 1100-1200 sq ft in the kiln, 3-4 wks, 2 batches
-- 1 wk for planing
-- 2 days milling
-- John would like to lend a hand in the process, if practical

Next Steps:
- John to research recommend max maple floor board width at the National Hardwood Flooring Assoc.
- John to get the logs cut and into position for milling
- John to measure moisture content of sub-floor"

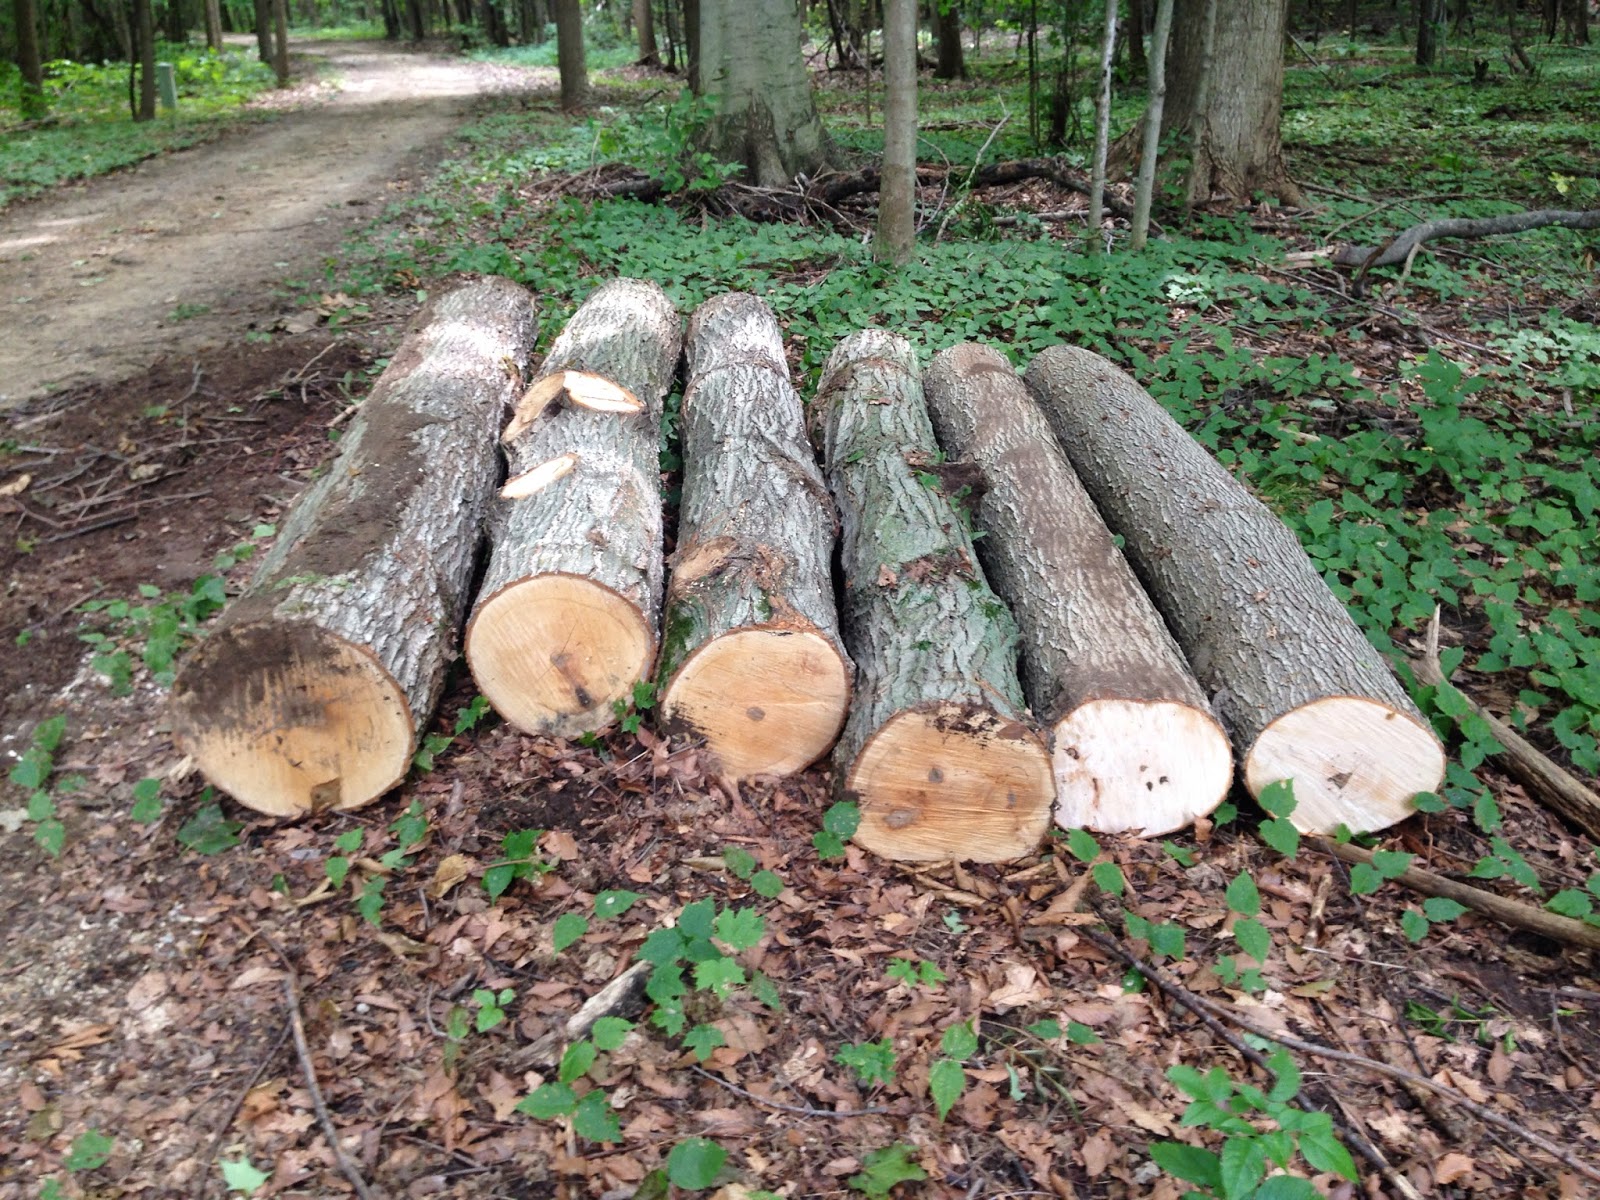
The first logs, cut to the length of 8 ft. 6 in., ready for the mill
I am planning for the process to yield 2,200 square feet of 3/4 inch thick flooring, in random 3, 5, and 7 inch widths.  Assuming 20% waste, or loss, from log to floor, I need 2,750 board feet* of log on the ground; by my calculations I have about a fifth of that on the ground now.  I plan to participate in the milling, drying, and planing processes, as this type of work might provide a stream of income in the future.

*A "board foot" is 1 square foot, 1 inch thick, or 144 cu. in. of wood.  For example, a 3 in. wide (1/4 foot wide) floor board, 4 feet long, and 1 in. thick, is 1 board foot of wood.

At a high level, the process steps are as follows (estimated cumulative calendar weeks from start):

1) Mill the logs into boards of random 3, 5, and 7 inch widths, 1 inch thick, maximizing utilization (1 week)
2) Air dry the boards for 3 to 5 weeks, depending on the weather (4-6 weeks)
3) Kiln dry the logs in 2 batches, each requiring 3 to 4 weeks (10-14 weeks)
4) Plane the boards to 3/4 inch finished thickness, and add tongue and groove to long edges (11-15 weeks)

Per square foot, before finish and installation, the cost is estimated to be $3,851.25/2,200 sq ft = $1.75/sq ft.  And if in fact the "10% waste factor" is unnecessary, the total is $3,700/2,200 sq ft = $1.68/sq ft.  That amounts to 65-75% less than "retail."  Well worth the investment of my time, and of some money in additional equipment; a Peavy (Peavy Manufacturing) and a chainsaw-powered winch and accessories (Lewis Winch), both for moving/handling the logs, and felling wedges (Timber Tuff).  These tools will provide many years of service.

International 1/4 inch Log Rule [1]
So, one might ask oneself, how do you know how much flooring you have on the ground in the form of logs, or, how much flooring is in that tree over by 'der?  Needless to say perhaps, some smart folks have already figured that out for us.  There are many so-called "log scaling" rules, fortunately "only three, Doyle, Scribner,
and International, are widely recognized and in current use."[1]  Doyle is the simplest in terms of its formula, Board Feet Doyle = (D-4)2 x (L/16), where D is the diameter in inches, and L is the length in feet.  Unfortunately, since Doyle subtracts 4 inches from the diameter for "edgings and slabs," it dramatically underestimates the amount of wood in smaller logs.  I am taking down trees in or close to the specified range of 16-26 inches in diameter, and closer to the small end of that range.  At a log diameter of 16 in., the Doyle scale underestimates board feet by 20% compared to the scale regarded as the most accurate, the International 1/4 inch Log Rule.  "The International Rule was developed by Judson F. Clark in 1900 while working for the Province of Ontario. It is probably the most accurate of the current rules but has found little use. It is based on a very carefully researched analysis of the losses occurring during the conversion of sawlogs to lumber and is one of the few rules incorporating a basis for dealing with log taper. Based on studies of northeastern tree species, Clark made a conservative taper assumption of 1/2-inch change in diameter for every 4 feet of log length."[1]  Since I am not using the rule to establish price, rather only the quantity in board feet that I will deliver to the mill for processing, I intend to use the most accurate estimate available.  I have abbreviated the table; the full table can be retrieved as referenced.

My understanding of the terms "slab," "cant," and "edging" as they apply

to the milling of logs

I have felled three trees so far, yielding a total of nine 8 foot 6 inch logs.  For my purpose, to ensure that I put enough logs on the ground, I am rounding the length down to 8 feet, and the diameter down to the nearest inch.  The log diameters and board feet (from the table above) then are: 13/55, 14/65, 14/65, 15/75, 14/65, 13/55, 14/65, 14/65 and 13/55, for a total of 565 board feet.  Since I need to deliver 2,750 board feet to the mill, I have 20% of the total on the ground.  I am not taking trees for their size, rather I am taking the trees where I need to clear space for future buildings, including but not limited to, the sugar shack, outdoor wood boiler room, firewood shed, and workshop.  In those locations I have identified for felling some larger trees, so I hope I will need to put only 6-7 of the larger trees on the ground to reach the 2,750 board feet objective.  Which brings us to the question of scaling standing trees.

Again, there are numerous methods for determining the volume in board feet of standing trees (also known as "stumpage," in the vernacular).  For the sake of consistency, I will stick with what again is considered to be the most accurate method, and that is the International 1/4 inch Log Scale volume table, as adapted for Form Class 78.  To enter the table, the Diameter at Breast Height (DBH, 4-1/2 feet), the "merchantable height" (in 16 foot logs), and the "form class" (percentage ratio of the diameter inside the bark at the top of the first merchantable 16 foot log, to the DBH (outside bark)) are are required.
Gross Volume of Trees, International 1/4 inch Log Scale,
Form Class 78 [1]

"Form class can vary for a given species, age, diameter, and height. For the most accurate estimates, a separate form class should be determined for each diameter class and species tallied."[1]  Until I establish by measurement otherwise, I will use a volume table for the International Rule, based on Form Class 78, "the most commonly used class."[1]  I have abbreviated the table; the full table can be retrieved as referenced.

Simply stated, "merchantable height includes that portion of a tree from stump height to a point on the stem at which merchantability for saw timber is limited by branches, deformity, or minimum diameter."[1]

There is a long way yet to go on this project, and a great deal to learn along the way.  We are hopeful that we will have our sugar maple flooring installed by late spring, after the maple sugaring season ends would be convenient, though it is unlikely that the dates will line up to support our convenience, knowing Murphy as we do.

There is a new feature at the bottom of the page, where you can record your "reaction" to the post.  Thank you for reading and commenting on the blog.  Your comments and criticisms, your inputs and acknowledgements, are welcomed, and will help me to improve my posts.  I am learning, too.

 Please "follow" the blog by clicking on "g+ Follow," or by e-mail at  "Follow by Email."   Also, "Like" us on Facebook at www.facebook.com/swmichiganhomestead.

-- John, 23 October 2014
www.swmichiganhomestead.blogspot.com

[1] "Log and Tree Scaling Techniques," Purdue University, Forestry and Natural Resources, Web. Retrieved 22 October 2014.

Tuesday, March 4, 2014

Late Winter 2013/2014 - Weekend of 1 Mar 2014

The weekends provide opportunities to take on more time-consuming projects, and this weekend was no exception. There is much forest management work to do on the property leading up to planting in the spring, and winter has also traditionally been a time when the fuel-wood stores were stocked.  And, I want to show just briefly, a plumbing repair I substantially completed this past weekend.  Later I will make a very detailed post regarding the cause(s) of the damage.
The largest of four trees, an American Beech.  Some of the four smaller trees
in the upper right corner, one of which was a Sugar Maple.

Saturday morning I spent about 4 hours working the slope just south of the house; two reasons, the first is that we needed some firewood, and secondly, I am removing dead-fall and live trees selectively to bring more light and life to the forest floor in the spring.  There is a tremendous amount of dead-fall, with many trees having been broken off by wind 20-30 ft off the ground.  I identified four trees, two with the tops broken off 30 feet or so above ground, and two others that had been damaged by the fall of the first two.  The biggest tree, an American Beech, pictured, was probably close to 10 inches in diameter; the smallest perhaps 4 inches in diameter.  A chainsaw is simply a must-have on the property.  It seems like the most respected brands are Husqvarna and Stihl; I chose Husqvarna because I can get parts and service at my local hardware store, and I chose the "460 Rancher" model because that is the hardware store's rental saw of choice.  While there are lighter and more powerful saws in the Husqvarna line-up, I took the fact that it was chosen for rental use (abuse) to be testament to its reliability and durability.  So far, I have no reason for buyer's remorse; it is a great saw.  I am new to chain saw use, so I will not offer anything close to "instruction" regarding their safe and effective use; if you are interested, and a visual learner, please consult www.YouTube.com/user/HusqvarnaUSA, it is one of the many "classes" I am taking at "YouTube University."  You also might want to visit Cody at http://www.youtube.com/user/wranglerstar; he is very knowledgeable and devotes much of his time to all matters having to do with coniferous forest management.

Trees have been "limbed" and branches set off to the left, trunks have
been "bucked"
After felling the tree(s), the next step in the process is "limbing," which is to say removal of the branches from the stem of the tree.  The chain saw can be used for larger branches, though in this case all of the limbs were small enough that I used an axe for limbing.  I use dry branches of less than about 1-2 inches in diameter for "stick fuel," or as kindling, and will chip green branches of up to 3 inches in the spring for use on foot paths, in compost, etc.  Having "limbed" the trees, "bucking," that is cutting the main stem into usable lengths, is the next step in the process; this is work for the chain saw. [1]

About halfway to completion;  a plastic sled, is used to move
wood around in bulk
Since the bucked pieces of the trees were to be used for firewood, I then split the wood using my Gränsfors Bruk Splitting Maul.  I use a plastic sled in winter, this one picked up at a local Tractor Supply as I recall, to move the bucked sections to nearer the stack for splitting.  Of course the sled can double for snow sledding, to drag your deer out of the woods, or to haul your ice fishing equipment onto and off the ice.  Lesson learned:  Either cut the trees uphill from where you are going to stack the wood, or stack the wood downhill from where you cut the trees!  A workout is one thing, but let's not go crazy.

There are numerous schools of thought on how best to dry firewood.  Having split the wood, I stack it bark-side up to the extent possible, so that it will shed water more effectively, and then cover the stack with a tarp, or with construction plastic as in this case.  This keeps snow and rain from dropping directly onto the stack, and yet allows for airflow through the stack.  I suppose that as usual "it depends," on any number of factors, but I am planning on drying-time of 9 months before use as firewood.  For lumber (planks or posts, etc.), the rule of thumb is one year per inch of thickness.

Done.  The stack covered by construction plastic to protect it from
rain  and snow, while allowing air flow through the stack.
I can say that I am pretty happy with how much wood I was able to put away for use next fall and winter, and I made some progress in "cleaning up" the hillside.  We have put up three or four face cords this year I would estimate, in excess of all that we have used.  A face cord is defined as a stack 8 feet long by 2 feet across by 4 feet high, while a full cord would be 4 feet across.  Ultimately the wood will be used in the wood burning stove, the fireplace, the fire pit, or in an outdoor kitchen for boiling down maple sap to make maple syrup.  For your reference, a "typical dry <full> cord of wood is enough to make about 15 gallons of syrup," [2] which requires boiling off approximately 630 gallons of water from the sap. There will be much more on maple syrup production in later posts.

Now to the plumbing, briefly.  The immediately obvious cause of the damage to the plumbing supply to one bathroom in the house, was freezing water.  As mentioned at the top of the post, I will address the plumbing issue in much more detail at a later date.  Suffice it to say for now though, that it is in most cases practically impossible to prevent water piping from freezing with 100% certainty.  Unless systems are in place that allow a homestead complete independence from the power grid, if power generation or transmission goes down, and stays down long enough, and if it is cold enough for long enough, piping will freeze.  In such a situation, it is of benefit to have "freeze tolerant" piping, that is piping that will not suffer damage from freezing.  Of course the foregoing assumes that the house has not been winterized, and the water piping system drained of water.  While researching methods of repair, I came across PEX tubing, the components designed to work with PEX, and the tools necessary for installation.  This stuff is sweet!  Easy to install, no glues or soldering, flexibility that reduces the number of angled fittings required, fittings that allow for connection to existing PVC, CPVC and/or copper piping, AND it is freeze tolerant. [3] If you look closely, you might see "safety wire" on the unused manifold valves; these wires will prevent inadvertent opening of the valves.   Consider PEX as a back-up to the back-up for damage prevention in extreme cold weather conditions.
Completed installation of PEX system in utility closet adjacent to the bathroom
And I almost forgot, that on Sunday Geri and I went with friends to a "Home Maple Sugaring" course at the Kalamazoo Nature Center, just north of Kalamazoo, MI.  The course consisted of about 40 minutes in the classroom, where the end-to-end process was described, from the tree identification to the bottling of syrup, and where we sampled maple syrup and some wine made from maple syrup.  The intensity of the maple flavors was simply incomparable to store-bought maple syrup.  After the classroom portion of the course we ventured outside and Geri was picked for the demonstration of tapping a tree, so she got our first practical experience in doing that.  We had a great time, visited the gift shop after the course, and signed up as members of the KNC.  This coming weekend we will be putting our education into practice and tapping our own Sugar Maples.

Your comments and criticisms, your inputs and acknowledgements, are welcomed, and will help me to improve my posts.  Please "follow" the blog.

-- John, 04 March 2014.

[1] Stelzer, “Felling, Limbing and Bucking Trees,” University of Missouri, Extension, http://extension.missouri.edu/p/g1958
[2] The University of Vermont Proctor Maple Research Center, “Energy Use in Maple Operations,” http://www.uvm.edu/~pmrc/wilmot_energy.pdf
[3] Burch. 2006. “Northward Market Extension For Passive Solar Water Heaters by Using Pipe Freeze Protection with Freeze-Tolerant Piping,” National Renewable Energy Laboratory, http://www.nrel.gov/docs/fy06osti/39664.pdf